Picture This

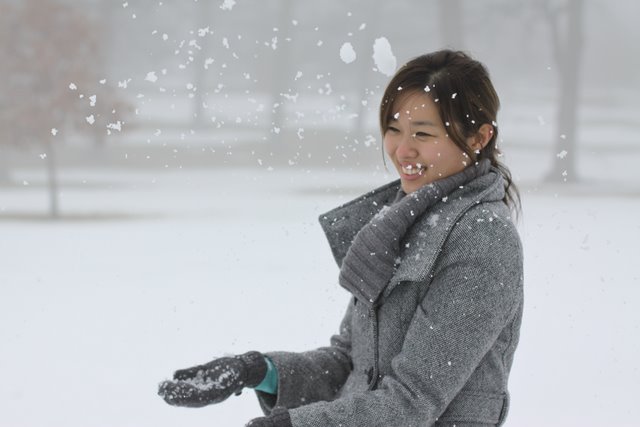
 Canon 50D, 50mm, f/1.4, 1/25 sec., ISO-400, Exp. -1, AWB
Disclaimer: I’ve only just began my journey in DSLR photography a few months ago so I don’t claim to be an expert on any of the subjects I post on, but it is just how I have learned them.
I’d like to dedicate my first “Picture This” post to one of my favorite aspects of photography:
bokeh
First of all, how do you even pronounce that word? “Boke-uh”, “Bow-kay”?? I’m unsure of the official pronounciation and it’s not listed on Wikipedia, hmph. I just know that the word comes from the Japanese word boke, which means “blur” or “haze”. All you photographers out there, how do you pronounce it?
What is bokeh?? Well, it’s the aesthetic quality of the blur in out-of-focus areas of an image. In other words, it’s a photograph where the subject is in focus while the rest pf the photo is out of focus, blurred or fuzzy. Why would you want the photo to be blurry? Bokeh allows you to focus on the main subject without the background being a distraction.
And here is my explanation on how to achieve it… with some help from J Le Took This on the more complicated and technical parts!
- Adjusting your aperture (or depth of field) is one way to achieve this effect. When a lens is stopped down to its maximum aperture size or lowest F stop number (I know it sounds backwards right?! It took me awhile to understand that max aperture = low F number and min aperture = high F number), out-of-focus points in these blurred areas will take on the shape of the opening of your lens.
- Adjusting your focal length is another way to achieve this effect. Basically the longer your focal length, the more bokeh you will get. Longer focal length is associated with larger magnification of objects and a narrower view. Another thing to note is that the max aperture on a lens varies at a different focal lengths. For example, on my 28-135mm lens, the max aperture is f/4.5 at the wide end and decreases to f/5.6 at the tele end.
- Lastly, subject distance from the lens/camera and subject distance from the background are factors that play into bokeh. So assuming at a given aperture and focal length, the closer the subject to the camera, the shallower depth of field. For example, the depth of field in my cookie picture in the previous post is about 2 inches while a portrait of someone from 3 feet away has a larger depth of field to be able to be able to capture the person’s whole face in focus. Also, you will want to make sure that the background is a good distance outside of the depth of field of the subject to maximize the bokeh effect.
There isn’t a hard and fast rule for what makes a good, better, best “bokeh” image, I’d just say that, like beauty, it’s in the eye of the beholder. Cheesy, I know.
Here are a few “bokeh” images that I’ve taken! (I’m going to include metadata with pictures, when I can, so it may help all you photographers out there help me improve my skills!)
 Canon 50D, 28mm, f/3.5, 1/160 sec., ISO-250, Exp. 0, AWB
This picture of Jojo (my husband and my ever-so-cute stuffed animal son) was taken on the balcony in my hotel room in Cairo, Egypt. The “bokeh” background is of downtown Cairo, can you spot the McDonald’s?
 Canon 50D, 135mm, f/5.6, 1/2000 sec., ISO-250, Exp. 0, AWB
This suave fellow is my friend, Dustin. The “bokeh” background is the Temple of Karnak in Luxor, Egypt.
 Canon 50D, 50mm, f/2, 1/1000 sec., ISO-200, Exp. 0, AWB
My cutie pie nephew Evan is the main focus of this image, while his amazing parents (who happen to be my brother and sister-in-law) are part of the slightly “bokeh” background.
 Canon 50D, 50mm, f/1.6, 1/13 sec., ISO-200, Exp. 0, AWB
This picture was taken at my in-laws house during this past holiday season. In focus we have their mini Christmas tree, and the “bokeh” is on the picture and the wreath.
 Canon 50D, 50mm, f/1.6, 1/125 sec., ISO-400, Exp. -1.3, AWB
This picture was taken at the Columbus Zoo and Aquarium. The main focus is on the rather interesting looking puffer fish, while the “bokeh” background is on the rest of the fish and rocks in the aquarium.
 Canon 50D, 50mm, f/1.4, 1/25 sec., ISO-400, Exp. -1, AWB
This picture was also taken at the Columbus Zoo and Aquarium. You’ll notice that the subject is the yellow frog, while the “bokeh” consists of the background as well as the foliage in the foreground. This just shows that anything outside of the depth of field can be blurry.
Now it’s your turn! Leave a comment with a link to your favorite “bokeh” image that you’ve taken or have seen! And as always, if you have any input/suggestions/advice on anything I have said, please leave a comment and let me know!
![]()